If you’re working with ACF or JetEngine meta fields, the Ajax Connector is sure to revolutionize the way you work with the values contained within those meta fields. This is because this new and powerful feature will let you pair a special Interactor Event with any of your backend meta fields and have that event fire its operation using Interactor Triggers.
This means that we can manipulate and update backend meta field data using all of our favorite interactor Triggers, ranging from user interactions like click or double click, to more complex inputs like a specific element being inserted in the DOM. The moment the trigger fires, the meta fields will update, without needing to refresh the page.
We can even visualize the change immediately by using a Custom Field Dynamic Tag on any widget to fetch the updated values from our fields in real time.
Once our triggers are set up, we are one step closer to unleashing the new Ajax Event. If you are not sure how Interactor Triggers work, refer to the Interactor Module Page and the Interactor Overview Video. Having added a new item with the Event repeater, we can select Ajax from the Event drop down menu.
Let’s take a look at all the available options, in the order they appear within the event.

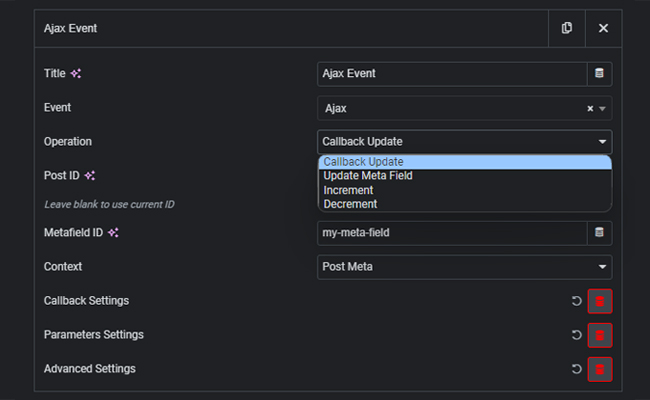
There are four operations available in the Operation menu.
Callback Update is the operation you want to select if you want to manipulate the value in any widgets that are connected to the targeted meta field ID via the Custom Field Dynamic Tag. This Operation will work just like the Update Meta Field Operation, but won’t actually change the value in the backend meta fields. It will only use them to update the output of the widgets connected to it, according to the Callback Settings and the Parameters Settings.
Update Meta Field will update the value in the targeted backend meta field according to the Parameters Settings. Using the Callback Settings, this operation too can of course update any widget connected to the fields.
The Increment operation will add the numeric value specified in Parameters Settings to the targeted meta field. This is especially useful for counters or similar functions.
The Decrement operation will subtract the numeric value specified in Parameters Settings to the targeted meta field. This means that if the numeric value is 1, for example, it will subtract 1. If we use -1, it will actually work like if we had incremented by 1.
This is the setting field in which we want to paste our Meta Field ID. This is the field that will be updated or otherwise manipulated by the event, as soon as the conditions for firing it are met by the triggers.
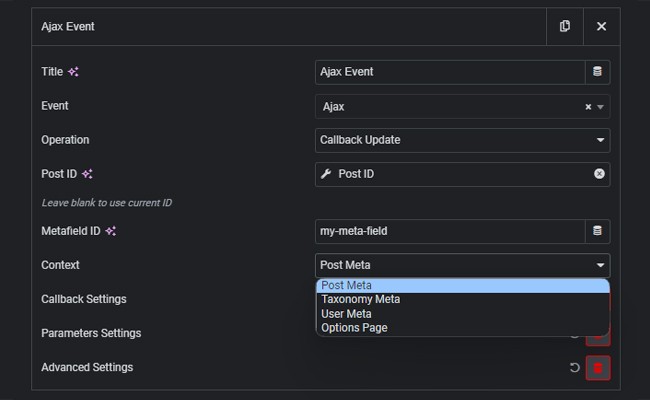
This menu lets us specify which kind of meta field the targeted ID refers to.

We can target Post Meta, Taxonomy Meta, User Meta and even the Options Page contexts with the Ajax Event.
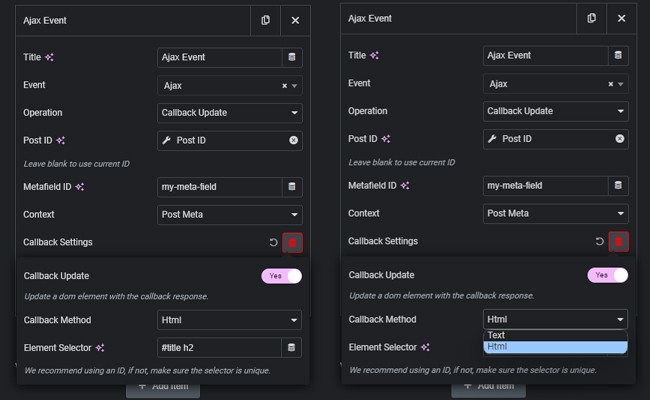
Toggling on Callback Update in the The Callback Settings will update the selected element in the DOM with the corresponding change determined by the rest of the Event and Parameters settings.

If we’re using any operation other than Callback Update, we can also keep this option toggled off, if we have no need to update any Element when the meta field targeted by the Event gets updated.
It’s important to note that when using Callback Update on a widget, we want to first give the widget an HTML tag, and target the tag as well in the Element Selector field, by typing the unique selector followed by the corresponding HTML tag. This is so that the styling options won’t get lost as soon as the value gets updated.
We can select between Text and HTML Callback Methods, depending on if we want plain text or otherwise.
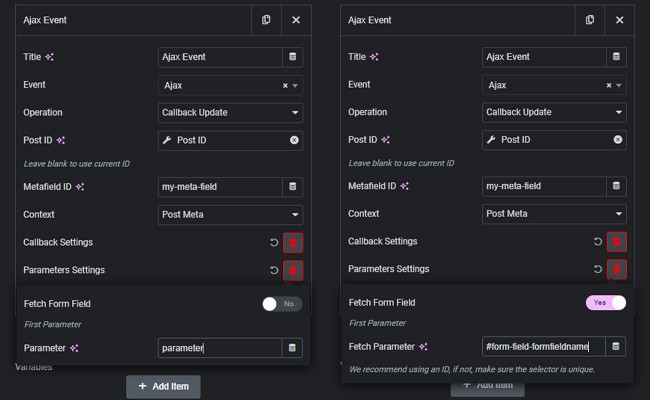
The Parameters Settings determine what value the meta field will be added, subtracted, or otherwise entirely substituted by in the meta field, according to the selected Operation.

We can add a manual parameter value, use a Dynamic Tag, or even fetch the value from a form field. If we choose that option, it’s important to remember that Elementor doesn’t actually identify its form fields by the ID we give them in their advanced tabs, but it will prepend #form-field- to the actual specified Field ID. You can learn more on this matter by watching the Interactor & The Inspection Tool and Fetching Form Field Values with Interactor Tutorials.
One very important thing to note is that since the update meta field operation will update the meta field directly from the frontend, it’s heavily recommended to not connect it to critical or otherwise important meta fields, as each meta field connected using this operation will become available for modification to anybody with access to the page. However, for an added bit of security, we can use Interactor conditions.
For example we can allow only logged in users to carry out more sensitive Ajax Events, by selecting user logged in as a precondition to allow the trigger connected to the event to fire. Or we can even require the logged in user to be an administrator. We can connect as many triggers as we need to each and any Interactor Condition, so we won’t need to create more than one.

Looking for a lifetime deal?